In order to write about wound care after amputation, I did a research on the guidelines in a well known Israeli’s hospitals, I was blessed to volunteer in rehab facilities and I trained newly amputees so this subject is close to my heart.
Initial Check-Up
If you are supposed to undergo a planned amputation surgery, your doctors will explain what will happen during and after the surgery.
Also, make sure to check out my post on Best Shoe Filler and Flip Flops for Missing Toes And Amputees.
Of course, if you have had a traumatic accident, your conversations will occur after the surgery. During these discussions, you have the opportunity to ask any question which is important to you.
It’s worth taking notes about what you want to ask your doctor before the discussions, so you will not forget anything.
Preparation Exercises Before Amputation Surgery
If possible, you should start doing exercises that will be useful after the amputation surgery before your surgery takes place. That way you can strengthen your muscles in advance.
It is also advisable to train properly to get out of bed in the wheelchair as soon as possible. The pre-surgery training can make time after surgery much easier for you. Ask your physiotherapist what exercises are right for you.
It is also a good idea to talk to a prostheses technician before the surgery on what types of prosthetics may be right for you.
Psychological Support And Conversation With Other Amputations
Amputation is a big change in your life and it might be helpful getting psychological counseling. Counseling can help you work out problems or concerns. I also recommend talking with colleagues who have also undergone amputation surgery.
It is good to hear how others are dealing with the situation and in many cases, they will also be able to share tips on everything starting from your type of prosthesis and getting the right fit. Talk to your treatment team about the best way to contact colleagues support groups.
What You Can Expect After Amputation Surgery
After the amputation of the limbs, you will be treated with a special wound healing bandage.
Your doctor’s main goal here is to heal the wound as quickly as possible.
The focus on the first period after surgery is about three treatment goals: reducing pain, your stump should be able to carry weight, and you should be able to move your stump optimally in all directions.
In order for this to work, your doctor or physiotherapist will explain some important things after surgery.
This includes correct bed positioning, muscle strengthening, and other exercises. These measures allow you to be more fit quickly and easily with the leg prosthesis so you can stay mobile and active.
Correct Posture
Immediately after surgery, you will probably not be able to lie still for longer periods of time or roll over in bed alone. For this reason, the nursing staff should be assisted several times a day.
A change of position is important since it allows you to ensure the best position without pain and helps prevent pressure sores. It also helps to prevent contracture, a bend that limits the range of hip or knee movement – which can make rehabilitation more difficult.
Wound Care After Amputation
When you wake up from anesthesia, your leg will be bandaged with simple bandages or a cast with a small drainage tube leading out of it.
This tube is placed into the wound during the operation so that the wound seeps and the blood can flow out of the wound and will be removed from the wound during the healing process.
In most cases, the amputation wound closes and creates a scar within three weeks to four, but even if the scar looks as if it has been well healed from the outside, only the color of the scar tissue changes slightly.
The full healing of the scar will take significantly longer, It takes about a year and a half until it is fully recovered. During this period, proper and good creams and dressings are very important in helping the scar tissue stay soft and supple – while developing the ability to carry weight so that the prosthesis can be worn.
Dressing
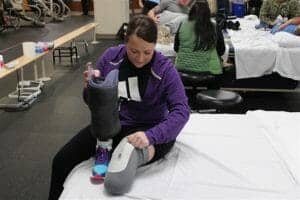
Pressure bandages with a special dressing technique after cutting. During the first few days and weeks after surgery, your stump will be treated by your therapist or by the nursing staff.
The bandage is often removed (initially at a frequency of every half hour) so that the stump won’t be wrapped too tightly or too loosely.
The therapist will also check the status of the stump, if the edema improves, and how the scar heals.
After sufficient healing, bandaging is sufficient to be only for a few hours at a time, for example before and after the leg prosthesis assembly.
Later, your therapists can show you how to apply the bandage so you can bandage yourself.
Make sure you know the dressing process and that you have been explained in detail to avoid mistakes that can cause the stump to swell, irritate or injured by a fold of the bandage.
It is also important that you clean the bandages thoroughly. You should dress the stump until it is completely healed. Once everything has healed, you can try to sleep every night without dressing the stump, but only after consulting your doctor, prostheses technician, or physiotherapist.
However, if you experience a lot of swelling in your stump the next morning, you should proceed with bandaging.
Pressure socks
Pressure socks can also be used instead of bandages. The socks are also elastic and available in different sizes. Like elastic bandages, the socks should be washed daily and let dry so that they will not lose their elasticity. The advantage of pressure socks is that they are easy to put on the spot.
Silicone sleeve
In addition to elastic bandages and pressure socks, silicone sleeve can offer another method for achieving compression. Like pressure socks, silicone sleeves are available in standard sizes as well as individually.
The sleeve puts equal pressure on your amputated limb. In addition, flexible, skin-friendly silicone can help make the scar soft and flexible.
To put the sleeve it is better to turn it from inside out and then roll it evenly over your amputated limb.
Do not pull it like a sock, and make sure that no folds or pockets of air are formed.
Clean your silicone sleeve every day with a skin friendly soap and warm water. If you sweat a lot, you should clean it a few times a day and maybe use disinfectant.
How To Properly Treat Your Amputated Limb
Your therapist will show you how to properly treat your amputated limb. To prevent the skin from becoming rough and scaly, rinse the amputated limb with warm water and a gentle soap every morning and evening.
Then dry the skin thoroughly and put cream. Also, look for injuries, pressure sores, and blisters while you treat your stump. They must receive medical treatment.
Regular and careful massage on the traction of the scar is another important component of stump treatment.
Rehabilitation process
Your treatment team will decide when you can start with an intensive rehabilitation based on your recovery ability. During your rehabilitation process, you will be fitted with a prosthesis adapted to your specific needs and will be supported by a rehabilitation team that can include doctors, occupational physiotherapists, prosthesis technicians, and nursing staff.
These professionals are there to support you and to ensure that you are well prepared.
During rehabilitation, you will learn how to give proper treatment to your stump as well as the rest of your body.
Before you can use a prosthesis on your leg, your stump must heal and reach the right shape.
This means that all the fluid accumulated by the action has been removed by bandaging and that the edema in the amputated limb disappears.
Once your stump has recovered and you can carry weight, you will begin to practice using your prosthesis.
At first, you will learn how to put the prosthesis and remove it as well as take care of it.
Later, you will learn how to walk with the prosthesis, so-called learning to walk.
Fitting The Prosthesis
After your amputation, you should be equipped with the best prosthesis for your needs.
The things that influence the selection of a suitable prosthesis for you include the level of fitness and health, the level of amputation, the requirements you place and your private professional environment.
The prosthesis on your leg will help restore much of your mobility and contribute to your ability to manage your life without help from others.
When you put your prosthesis, you can help prevent problems of balance that can arise due to the missing weight of your broken leg. In addition, you can also avoid over-exertion and long-term damage by wearing your dentures.
After the amputated organ will heal and you are in good health again, the process of adjusting the final prosthesis to your leg will begin.
Even before this stage, your prosthesis technician will meet you to better understand your needs and desires.
In addition, he will be impressed by your stump shortly after the amputation and find out what is right for you. You may go through a few attempts to make sure everything fits.
Be patient with the adjustment process.
Training For Your Prosthetic Use
The purpose of rehabilitation training with a physical therapist is to help you reach mobility and independence as much as possible. The therapist will help you learn how to use your prosthesis properly.
This includes putting the prosthesis and removing it, getting up and sitting down, balancing and walking training.
Stages Of Prosthesis Preparation
The first and most important stage is the step of taking measurements. The technician takes the circumference of the stump and then draws all the places to release pressure from the stump and all the places where the stump can be supported.
The stump is then wrapped in a special plaster bandage and a stump pattern is created into which the plaster is filled. After the plaster has dried, the technician begins processing it to reach the exact size of the stump. On the plaster he pure stump module.
The next step is to cast a module on your hard stump model. This casting is made using a special acrylic material that combines various types of socks and to strengthen the stump model, the technician will use carbon fibers and glass fibers that are strong and lightweight materials.
The next step is the measurement phase of the prosthesis. The amputee enters the new stump model and starts walking. The technician will adjust the prosthesis and height until he reaches an optimal walking position.
After the directions are finished the technician will take the prosthesis to the final stage and work out its form as cosmetically as possible to the other leg.
I hope that this article has helped you know more about wound care after amputation.

Hi, my name is Eddie, I am a professional trainer specializing in the elderly population and I’m also a website designer. I love training in the gym, going to the beach, traveling, and having good food.
I combined my love for sport and website designing to make “DisabilitEase” whose purpose is to help elderly and disabled people live a more full and active life, have more fun, and enjoy their unique journey despite any disability.


